RAW4: Info — Aura Bodies and Reach & Withdraw
AUDIO: (No audio)
Response Options:• Close this extra window • (browser back arrow greyed out) when readyNotes:R & W on 7 bodies
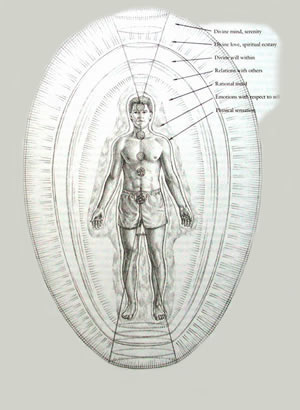
The different bodies or levels or bodies (same thing) of the auric field inter-penetrate each other and the human body. Each successive body is finer, and exists on a deeper 'dimension' than the one next to it, but they overlap in space. The words in the figure to the right, arrowed to the corresponding levels, are: 7 Divine mind, serenity; 6 Divine love, spiritual ecstacy; 5 Divine will within; 4 Relations with others; 3 Rational mind; 2 Emotions with respect to self; 1 Physical sensation. Here is a simple diagram to show this: XXXXXXXXXXXXXXXXXXXXXXXX Aura Level 7 (finest, least dense) XXXXXXXXXXXXXXXXXXXXXX Aura Level 6 XXXXXXXXXXXXXXXXXXXX Aura Level 5 XXXXXXXXXXXXXXXXXX Aura Level 4 (finer than 3, not as fine as 5, etc.) XXXXXXXXXXXXXXXX Aura Level 3 (denser than 4, not as dense as 2, etc.) XXXXXXXXXXXXXX Aura Level 2 XXXXXXXXXXXX Aura Level 1 XXXXXXXXXX Physical Body (coarsest, most dense) Let's represent where one's attention is being deliberately placed by coloring the X's green, and where it is being deliberately withheld from by coloring the X's red. Black X's represent however it is without attention being directed to that body particularly. So, to save space, we'll just consider a few of these bodies, although this description could apply to all of them. These are "snapshots" of different times during a session, not consecutive commands. Note that Boxes 5 and 6 represent two alternative possibilities in executing the "Withdraw from Aura Body 1" command. Both are acceptable. Similarly, Boxes 9 and 10 represent alternative ways of executing the "Withdraw from Aura Body 2" command. |
Notes (continued):
Wrong way to do itUsing the same representation, here are an example of what not to do. These two boxes show the mistake of putting attention on only the part of the first aura body that extends out from the physical body, instead of the whole of it.
|